How to Feed a Single Sheet on Dell Laser Printer
When you want to print on paper that is not loaded in the paper drawer, load the paper in the manual feed slot. Load the paper that you usually use in the paper drawer (Loading Paper in the Paper Drawer).
IMPORTANT
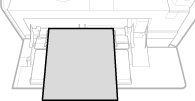
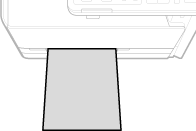
- Make sure to load paper in portrait orientation
Paper cannot be loaded in landscape orientation. Make sure to load the paper in portrait orientation, as shown in the illustrations below.
MF8580Cdw
MF8280Cw
For the MF8580Cdw
IMPORTANT
- Make sure to insert the paper drawer
The machine only prints when the paper drawer is inserted, even if paper is loaded in the manual feed slot. An error message is displayed if you attempt to print without inserting the paper drawer.
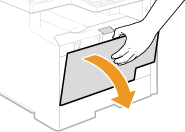
1. Open the cover.
- Hold the top center of the cover to open it.
2. Pull out the paper tray and the tray extension.
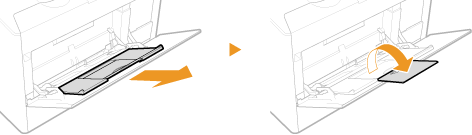 NOTE:
NOTE:You only need to pull out the tray extension if you are using paper larger than Letter size.
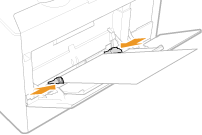
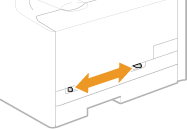
3. Spread the paper guides apart.
- Slide the paper guides outward as shown in the illustration.

4. Insert the paper into the manual feed slot until the paper stops.
- Load the paper in portrait orientation (with the short edge toward the machine), with the print side face up. Paper cannot be loaded in landscape orientation.
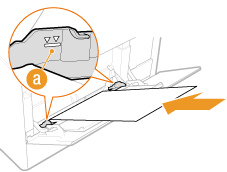 IMPORTANT:
Do not exceed the load limit mark when loading paper
Make sure that the paper stack does not exceed the load limit mark (a). Loading too much paper can cause paper jams.
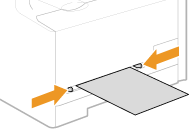
5. Align the paper guides against the edges of the paper.
- Slide the paper guides inward until they are aligned securely against the edges of the paper.
 IMPORTANT:
Align the paper guides securely against the edges of the paper
Paper guides that are too loose or too tight can cause misfeeds or paper jams.
6. Specify the size and type of loaded paper.
 Loading Envelopes
- Before Loading Envelopes
Follow the procedure below to prepare the envelopes before loading.
NOTE
On the MF8280Cw, only one envelope at a time can be loaded into the manual feed slot. Follow steps 1 to 3 in the procedure below to prepare the envelope for loading.
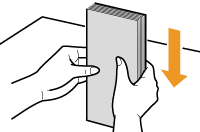
(1) Close the flap of each envelope.
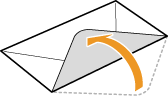
(2) Flatten them to release any remaining air, and make sure that the edges are pressed tightly.
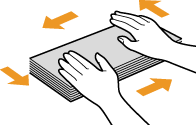
(3) Loosen any stiff corners of the envelopes and flatten any curls.
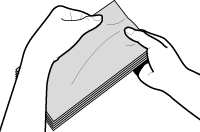
(4) Align the edges of the envelope on a flat surface.
- In the Manual Feed Slot
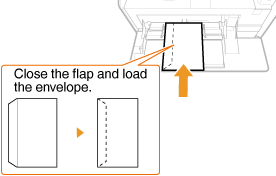
Load the envelopes Monarch, COM10, DL, or ISO-C5 in portrait orientation (with the short edge toward the machine), with the non-glued side (front side) face up. You cannot print on the reverse side of envelopes.
IMPORTANT
Load only one envelope for the MF8280Cw each time you print.
NOTE
Load the envelopes so that the edge with the flap is toward the left side as shown in the illustration.
For the MF8280Cw
IMPORTANT
- Make sure to insert the paper drawer
The machine only prints when the paper drawer is inserted, even if paper is loaded in the manual feed slot. An error message is displayed if you attempt to print without inserting the paper drawer.
1. Spread the paper guides apart.
- Slide the paper guides outward as shown in the illustration.
2. Insert the paper and align the paper guides against the edges of the paper.
- Load the paper in portrait orientation (with the short edge toward the feed slot), with the print side face up. Paper cannot be loaded in landscape orientation.
- Insert the paper 3/8" to 3/4" (10 to 20 mm) into the manual feed slot, and then slide the paper guides inward until they are aligned securely against the edges of the paper.
 IMPORTANT:
 Align the paper guides securely against the edges of the paper
Paper guides that are too loose or too tight can cause misfeeds or paper jams.
3. Insert the paper slowly into the rear of the manual feed slot.
- The paper is pulled slightly into the machine when inserted into the slot.
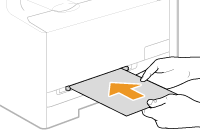 IMPORTANT:
Load only one sheet of paper at a time
Only one sheet of paper can be loaded each time you print.
4. Specify the size and type of loaded paper.
Loading Envelopes
- Before Loading Envelopes
Follow the procedure below to prepare the envelopes before loading.
NOTE
On the MF8280Cw, only one envelope at a time can be loaded into the manual feed slot. Follow steps 1 to 3 in the procedure below to prepare the envelope for loading.
(1) Close the flap of each envelope.
(2) Flatten them to release any remaining air, and make sure that the edges are pressed tightly.
(3) Loosen any stiff corners of the envelopes and flatten any curls.
(4) Align the edges of the envelope on a flat surface.
- In the Manual Feed Slot
Load the envelopes Monarch, COM10, DL, or ISO-C5 in portrait orientation (with the short edge toward the machine), with the non-glued side (front side) face up. You cannot print on the reverse side of envelopes.
IMPORTANT
Load only one envelope for the MF8280Cw each time you print.
NOTE
Load the envelopes so that the edge with the flap is toward the left side as shown in the illustration.

Source: https://support.usa.canon.com/kb/index?page=content&id=ART141999
0 Response to "How to Feed a Single Sheet on Dell Laser Printer"
Post a Comment